Using beeswax as an intaglio ground
Whilst writing Making an Engraved Matrix a while ago, I briefly showed the method of using beeswax as a resist, or ground. I didn’t go into much detail, given that the topic of that post was really engraving. So now it would be good to talk about the method in its own right. I’ve also taken the liberty to use a few of the pictures which accompany that post, as they are directly applicable here.
Beeswax is considered to have been the first resist used in the intaglio method of etching. Recently, the dating for the first extant etching has been pushed back with the identification of the print ‘Die Schlacht von Thérouanne’ (The Battle of Thérouanne) by Daniel Hopfer as being a print made from an etched plate in around 1493. There is an interesting article about etched armour here with some more information about Hopfer:
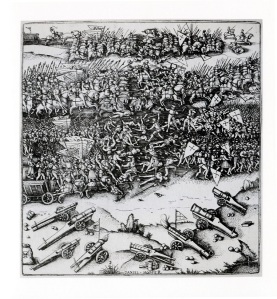
Die Schlacht von Thérouanne/The Battle of Thérouanne
Daniel Hopfer
Etching on iron
Augsburg c1493
Given that Hopfer was already designing decorations for armour by etching, it’s logical to assume (unless further research discovers otherwise) that it was he who was primarily involved in first developing and applying etching to printmaking. It is noted in Ad Stijnman’s Engraving and Etching 1400 – 2000 that Hopfer’s first printed works were using beeswax as a resist on iron plates. The use of iron plate and beeswax as the initial materials is a natural choice, given that he already had experience in using these in the production of decorated armour.
Beeswax is thought to have remained the most common resist used until recipes were developed which incorporated other ingredients such as rosin. As far as research can tell, the main reason for the move away from pure beeswax as a ground is because of it being prone to foul-biting. Foul biting, or foul bite as it can also be referred to, is when the ground begins to break down on the plate, allowing acid to bite into the areas which should remain clean and free of any marks. Adding rosin and other ingredients appears to have made the ground more robust, and less prone to break down in the acid.
Foul biting is something which most printmakers are eager to avoid, as it can ruin the image and cause the artist to start afresh with a new plate, depending on the image and the desired finish. As you’d imagine, this can be costly and time consuming. In this instance, however, it became one of the reasons I wanted to explore using beeswax, to discover exactly what the foul bite would look like. I have experienced foul bite before with hard ground but in general, if you apply a modern ground well, to a properly prepared plate, and are careful/attentive in the process of biting the plate, it is reasonably easily avoided.
I was also very curious to experience how the scribe/needle pushes through the beeswax as one draws upon the surface of the plate. There is wax in most modern grounds, liquid, hard and soft, but the texture is different due to the other ingredients. I had concerns that the beeswax might flake off if it were too thin. Or perhaps the beeswax could become too warm as the hand rested upon it during the scribe work, or too malleable as the scribe was drawn through it, and distort the linework.
The initial preparation was the same as other plates, being degreased and left to dry. Then, instead of liquid or hard ground (that which contains other ingredients) being applied, beeswax was applied instead. This was done in the same way as applying a hard ground – the plate was heated on a hotplate, hot enough to melt the wax, but not hot enough to distort the plate. The beeswax was moved over the entire surface until there was as even a coating as possible, and then removed to allow the wax to cool and solidify.
As you can see, both here and in the post about degreasing, that there are small areas which have a thinner coat of beeswax. This is where I imagined that the foul bite would occur, as the acid would have more chance of breaking down these thinner areas as the linework was being bitten. Most grounds will eventually begin to break down, given enough exposure to acid.
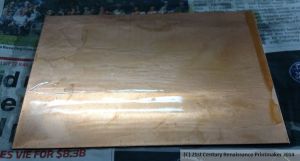
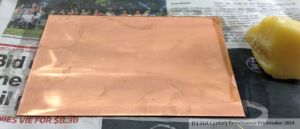
Above left, beeswax melted on the copper plate, and right: starting to solidify
In Engraving and Etching 1400 – 2000 there is reference to plates being prepared by dipping the entire plate into beeswax. This certainly would result in a better coating, and would be something to explore in the future, for at present I do not have the right sort of recepticle for dipping a whole plate. This method could, however, have a problem in regards to using acid in modern practice, where the acid is in large plastic (chemical-proof) trays. In trying to place the plate in and remove from the acid, it would potentially very easy to scratch the coating of wax on the back of the plate. This could cause unwanted etching (and therefore weakening) on the back of the plate.
In looking at other methods of applying acid in a pre-16th Century setting, one is described in this post, where the plate is tilted, and acid poured down the surface, recollected at the bottom, and reused. Another method can be to form a ‘wall’ or dyke of beeswax around the edges of the plate, and pour the acid solution onto the plate. Both of these methods appear to be conservative in their use of chemicals, but whether this is due to safety concerns, price, or availablity, I am not yet entirely sure.
Once the beeswax was cool, the image could be developed on the plate. As per previous etched plates, the image was traced off, reversed, placed onto the plate, and transferred using a bone folder. I kept the image as simple as possible, as I was concerned the beeswax could remain soft enough that if the lines were scribed too closely, they could perhaps push the wax back into the previous line. If this happened, the lines would not be bitten properly, and the image distorted.
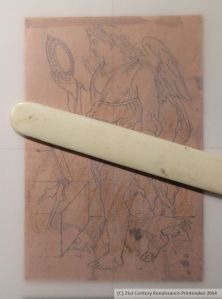
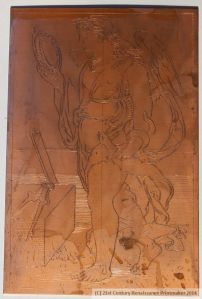
Above left: the image being transferred by rubbing, and above right: finished linework
The beeswax took the transferred graphite very well, making a clear outline on the translucent beeswax. Using the scribe through a translucent ground, however, was not easy, and required a bright, and directed, light to show up the shiny, scribed lines as I worked, to keep track of how the image was developing.
There was no cracking or flaking, as I had originally feared before putting the ground on the plate. However, there was a distinct difference between drawing a scribe through beeswax and drawing through the liquid hard ground. The beeswax layer was slightly thicker than the other ground, and the scribe made a finer line. It was easy to work, but there needed to be a bit more precision in making lines due to the pliability of the wax. I was correct about not being able to work the lines too finely, but nonetheless the wax held up to close lines very well, and I was able to make the image more detailed than I originally expected. I completely avoided any form of crosshatching, in case this lifted the hatched area of wax or pushed it around and obscured the lines.
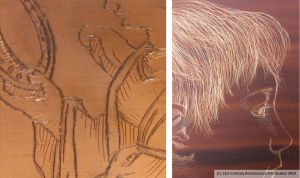
The result is hard to describe – to do my best, I would say that drawing through beeswax gave a precise, slightly cold or hard line, while drawing through the liquid/hard ground gives a softer, warmer, more expressive line. They are both appealing in their own way. Below is a comparison of the line work on the beeswax plate, and the line work on another plate which was prepared with liquid hard ground.
Above left: scribed lines through beeswax ground. Both the scribed and the transferred graphite lines are clearly visible, as is the translucent nature of the beeswax ground, and above right: scribed lines through liquid/hard ground
With the scribe work was finished, it was on to the biting. Another aspect I was curious about was not only how the beeswax would hold up in the acid, but how easily the exposed line would bite.
Once in the acid, there was an obvious difference – the bubbles forming on the exposed line were much, much smaller and finer than those which form on the lines exposed through liquid/hard ground. Bubbles forming through liquid/hard ground start small, but grow larger and finally pop or rise to the surface – the post about etching a plate has more information about this. The bubbles which formed using the beeswax ground began as very tiny beads, and barely developed from that size. If I hadn’t recently used the same acid to bite another plate with hard ground on it, I would have thought that the acid needed refreshing. The conclusion I drew was that the thickness of the beeswax, and the more precise line that the scribe work gave, resulted in a smaller area in the line exposed to the acid.
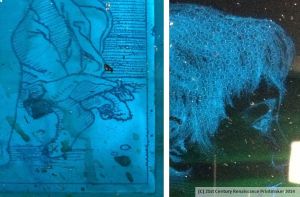
Above left: the beeswax ground plate and above right: a liquid hard ground plate. Both plates had been immersed in acid for approximately 5 minutes at the time of the photograph. In general, the bead on the beeswax plate did not develop into larger bubbles than can be seen here.
After about 5 minutes the plate was removed and rinsed for inspection. The acid had definitely worked, and the plate was starting to bite, as was shown by carefully placing the tip of a scribe into a line to test for depth.
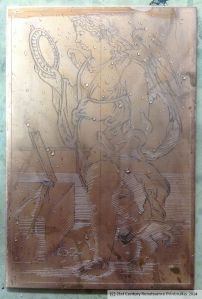
Above: the beeswax ground plate after 5 minutes of biting
There was also already obvious evidence of foul biting. Interestingly, it was not mainly in the areas where the beeswax ground was slightly thinner, although there was one area of that which looked like it was going to start breaking down a little. Most of the foul bite was beginning to occur along scribed lines around the edges of the plate, and around the very edges of the plate. Whereas liquid or hard ground remains reasonably robust around the edges, unless bumped or scratched, the beeswax was breaking down, even after 5 minutes. The ground on the main area of the image, however, was still in excellent condition.
What was also interesting to note was that the foul bite around the edges showed the texture of the fine bubbles which had formed. Not only had the finer beads not grown in size, but they had also been harder to feather away. Leaving bubbles on an etching line can result in the texture of the bubbles being left behind, and this can be seen in the picture below.
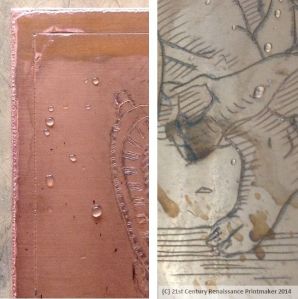
Above left: the edge and the scribed border line beginning to break down and above right: an area of the beeswax ground which was slightly thinner on the plate. One can see that the area of linework around the toes may be at risk of foul bite.
At this point, a modern printmaker wanting to protect their image would try to ‘block’ or ‘stop’ out the foul bite areas, if they feel the damage has not been so great and that the plate can still be used, but still needs to be bitten for longer. This is done with a liquid varnish, which is often rosin- or lacquer-based, or liquid bitumen which has been diluted with turpentine. It is an easy enough, if time-consuming, process. Once the blocked out areas are dry, the plate may be bitten again.
One can immediately see the main disadvantage here in having beeswax as the only ground available. In order to stop out with beeswax, it would have to be heated. To apply heated beeswax to the plate would not only be an imprecise art, but the warmed wax has the potential to remelt the wax already on the plate, and distort the image. In general, it would seem that the early etching artists had to do their best to judge damage and decide when to stop biting the plate, a balancing act between getting a deeper line – and therefore a better, more long-lasting image – and not ruining the surface of the plate.
And so back to the plate in hand – part of the exercise was to see how the foul bite developed, so the plate went back into the acid with no attempt to rectify the issue, which amused and/or slightly horrified several fellow printmakers… The plate was bitten three more times, with each time lasting approximately five minutes, making the total time in the acid about 20 minutes. Each time, the areas which were breaking down got a little worse, while the areas which were in good condition maintained their integrity. I thought this was interesting having previously thought that the beeswax ground, in general, would not stand up to the acid bath this well.
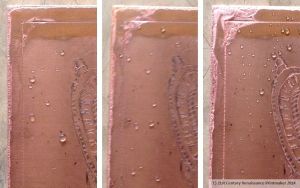
Above: comparison of the area of foul biting at 5, 10, and 20 minutes in the acid
In comparing the way the foul bite occurs over time, one can see that once an area has begun to break down, the area is bitten a little more deeply each time, and also that more of the ground around the edges breaks down as well, increasing the area on the plate which is suffering damage.
However, the actual level of damage and how the plate would print was yet to be ascertained. Even though the line bitten through the beeswax ground looked quite fine compared to that bitten through a liquid or hard ground for the same length of time, I felt it was time to stop biting the plate, and move on to printing. The foul bite had been observed in action, and I was keen to see what the plate looked like once cleaned up, because the damaged areas would look different again once the wax was taken off.
It then struck me that I had not read anywhere what would have been used to clean off the plate, and, having turpentine to hand, used that, which wasn’t very good. After a little more thinking the more obvious answer would probably have been very hot water – definitely something to try next time.
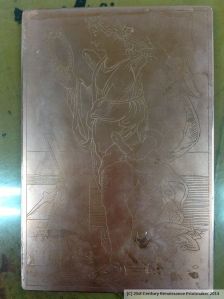
Above: the plate cleaned, edges filed, and ready for inking
After cleaning, the plate looked quite good. The line work was fine and reasonably shallow compared to a plate using liquid/hard ground, but it was consistently bitten. The foul bite did not look quite so awful, and was further minimised once the edges were filed to make ready for printing. The majority of the beeswax ground had stood up to biting perfectly, and the plate was untouched in those areas.
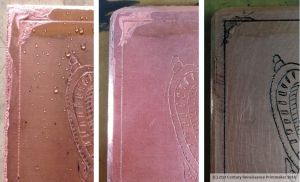
Above: the same corner after 20 minutes of biting with the wax ground still present; cleaned and with the corners filed; and inked up for printing
Surprisingly, the area where the ground was thinner – around the toes – had held up very well. The lines were etched a little heavier in that area, but the background had not broken down.
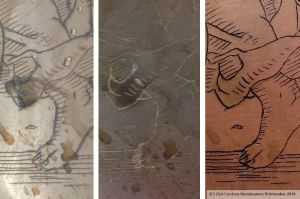
Above: the area on the plate where the wax ground had been slightly thinner, after 10 mins in the acid; after being cleaned; inked up ready for printing
After inking up, I could confirm again that the lines were consistently bitten, but reasonably shallow. The linework itself had a sparser look than I was expecting, but I had been conservative in that aspect anyway, for the reasons given earlier. At this point I was ready to print – see the post on the intaglio printing method for more details on this process.
The resulting print was a little bit light, but I suspect that was due to the pressure of the press at the time (which had been set for zinc plate) rather than the depth of the line or the inking. Copper plate is a fraction of a millimetre thinner than zinc plate, which is what most modern printmakers use, and I had forgotten to pack out under the plate with a sheet of newsprint.
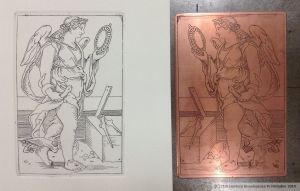
Above left: the resulting print and the plate
The areas with foul bite definitely printed with evidence of the damage – one can see that this is not what is desirable on a plate, as it would definitely affect its potential to produce prints of a saleable value. While I was quite fortunate that the damage on this plate occurred around the edges, which could potentially have the chance to be filed down or trimmed off, if the ground failed anywhere on the image the plate may be considered relatively worthless.
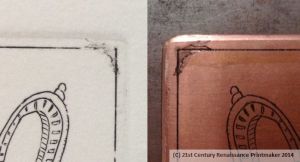
Above left: a detail of the print showing the result of the foul bite and right: as the foul bite appears inked up on the plate
It was also very interesting to finally see, on paper, the difference in line work between the wax ground plate and a liquid/hard ground plate once it had been printed. The mark-making for the hair in the image below (on the right) was deliberately more spontaneous as befitted the style of image I was attempting, but overall, the lines are bitten more deeply, and the line work is built up more like a sketch. In comparison, as mentioned several times, I was more conservative than usual with the scribe on the beeswax ground, but I believe that even if this was increased, that the overall feeling would still be more cool and precise.
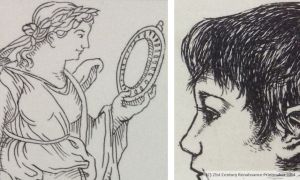
Above left: detail of the wax ground plate to compare with right: a detail of a plate using liquid/hard ground
In conclusion, I must say that this was a really enjoyable process. I set out to discover not only the mechanics of applying and using the beeswax ground, but also the disadvantages, and feel that this was accomplished. There will be further work in the future in order for me to attempt a more complex image, and to try to minimise (instead of deliberately maximise) the foul bite which occurred.
